How to Cook Real Lion's Head Meatballs: The Tender Way
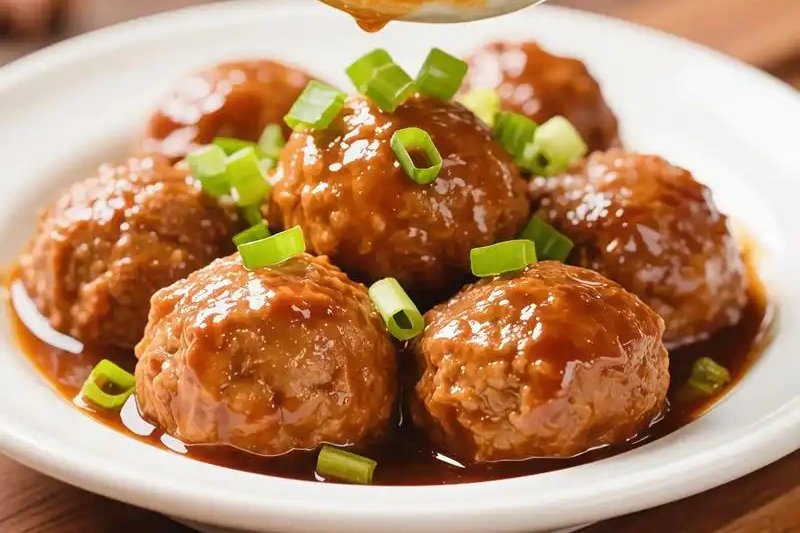
Editor’s Note: This is the step-by-step companion to Lion’s Head Meatballs — The Giant Pork Meatball That Collapses Under a Spoon . If you haven’t read the story behind these glorious spheres of surrender, start there. Then come back here to make them. This guide assumes you’ve already been convinced that hand-chopping matters. If you haven’t, reread the Enemies section of the narrative. We’ll wait.
Lion’s head meatballs (红烧狮子头, hóngshāo shīzi tóu) are the opposite of every Western meatball you’ve ever made. They’re not dense. They’re not uniform. They don’t bounce. The ideal texture is a pork cloud held together by faith and myosin — so tender you can split one with the edge of a soupspoon.
Getting there takes three things: the right meat, the right knife work, and the right amount of patience. Screw up any one of them and you’ll make something edible but wrong. A dense meatball in sauce is still dinner. But it’s not lion’s head.
Here’s how to do it right, drawn from years of watching Shanghai grandmothers and one very patient chef at a Yangzhou restaurant who let me stand in his kitchen for an afternoon.
Ingredients
The Meat
- 400g pork belly (五花肉, wǔhuā ròu), skin removed. You need the fat. This is not negotiable. Look for a piece with distinct layers — skin, fat, lean, fat, lean. If your butcher offers you lean pork loin, find a different butcher.
- 200g pork shoulder (前腿肉, qiántuǐ ròu). The lean structure that gives the meatball its body. Shoulder has enough intramuscular fat to stay tender without melting into nothing.
The ratio is roughly 2:1 belly to shoulder. Too much belly and the meatball collapses into a grease puddle. Too much shoulder and it’s a hockey puck with water chestnuts.
The Crunch
- 6 fresh water chestnuts (荸荠, bíqí). Fresh ones — brown, knobby, peeled to white — give a clean, apple-like snap that canned ones can’t match. If you absolutely cannot find fresh, canned whole water chestnuts are an acceptable backup. Rinse them well; the canning liquid tastes like metal and regret.
The Aromatics
- 3 slices ginger + 2 scallions for the infusion. You’ll smash them, steep them in warm water, and use only the liquid. Bits of ginger in the meatball are a textural distraction.
- 2 slices ginger, 2 star anise, 1 small cinnamon stick for the braising liquid. These perfume the sauce without dominating. Too much star anise and you’re making five-spice meatballs, which is a different dish entirely.
The Liquids
- Shaoxing wine (绍兴酒). You’ll use it in the meat mixture (2 tbsp) and the braise (3 tbsp). Buy drinking-grade. Cooking wine has salt added and tastes like a mistake.
- Light soy sauce (生抽, shēng chōu). Salt and umami. Used in both the meat mixture (1 tbsp) and the braise (2 tbsp).
- Dark soy sauce (老抽, lǎo chōu). Color and depth. Only in the braise (3 tbsp). It’s less salty than light soy, more fermented. Don’t swap them.
- 400ml water or unsalted chicken stock. Stock gives more depth. Water works fine — the pork and soy do the heavy lifting.
The Binders
- 1 tbsp cornstarch. The only non-traditional ingredient in this recipe, and it’s barely there. It adds insurance against meatballs that disintegrate. Traditionalists skip it. I’ve made it both ways. The cornstarch version survives the flip with more dignity.
- 1 tsp salt, 1 tsp white pepper. Seasoning for the meat mixture. White pepper is the heat you don’t see coming.
The Braise
- 30g yellow rock sugar (冰糖, bīngtáng). Dissolves slowly, creates a gloss on the sauce. White rock sugar works. Brown sugar doesn’t — it’s too aggressive and makes everything taste like a cookie.
- 4 large napa cabbage leaves. These steam the meatballs from above and absorb pork fat as they cook. By the end, they’re sweeter than the meatballs. Do not skip them.
For Serving
- Steamed white rice. Not optional. You need something to catch the sauce.
Prep Work
Step 1: The Ginger-Scallion Water (10 minutes before you start cooking)
Smash 3 ginger slices and 2 scallion sections with the flat of your cleaver. Just a firm thwack to release their oils. Soak them in 60ml warm water for 10 minutes. Strain. You now have a pale gold liquid that smells like the inside of a Chinese kitchen. This is what keeps your meatballs tender — the aromatics infuse the meat without adding fibrous bits that interrupt the texture.
Step 2: Hand-Chop the Pork (the most important 7 minutes of your day)
Cut the pork belly and shoulder into 2cm cubes. Spread them on your heaviest cutting board. Take your cleaver in one hand, or a chef’s knife in each hand if you’re cleaverless. Start chopping.
Why this matters: A meat grinder smears fat and tears muscle fibers, creating a paste that cooks up dense and bouncy. Hand-chopping separates the fat from the lean while keeping both in recognizable pieces. The fat stays in rice-grain-sized bits that melt during braising, creating channels of richness. The lean stays as a coarse mince with visible grain structure. This is the difference between a meatball that dissolves and one that resists.
You’re looking for: fat pieces the size of short-grain rice, lean that looks like coarsely ground meat. If you can still identify individual cubes, keep chopping. If it looks like a uniform paste, you’ve gone too far. After 5-7 minutes of chopping, drag your cleaver across the pile — it should look like pink gravel studded with white pebbles.
Step 3: Dice the Water Chestnuts
Peel fresh water chestnuts. This is annoying. The skin is thin and stubborn. Use a paring knife, not a peeler. Once peeled, cut into 3mm dice — small enough to distribute evenly, large enough to register as a crunch. You want about 1/3 cup of dice total.
Step 4: Mix the Meat
In a large bowl, combine the hand-chopped pork, diced water chestnuts, ginger-scallion water, 2 tbsp Shaoxing wine, 1 tbsp light soy sauce, salt, white pepper, and cornstarch.
Now stir. One direction only — clockwise or counterclockwise, pick one and commit. Use chopsticks or a wooden spoon. Stir for 3-4 minutes, until the mixture becomes sticky and starts pulling away from the sides of the bowl.
Why this matters: Stirring in one direction aligns the myosin proteins that have been released by the hand-chopping. These proteins form a loose network that holds the meatball together during braising. Stirring both ways tangles the network and weakens it. This is also why you don’t need eggs or breadcrumbs — the myosin does the work.
The mixture is ready when you can scoop up a spoonful and it holds its shape without slumping. If it’s too wet, add another teaspoon of cornstarch. If it’s too dry (unlikely with pork belly), add a splash of cold water.
The Cook
Phase 1: Form the Meatballs
Divide the mixture into 4 equal portions. Wet your hands with cold water — this prevents sticking and keeps the pork fat from melting on your warm palms.
Roll each portion into a rough ball. Then comes the trick: toss the ball firmly between your cupped palms 10-15 times, like you’re playing hot potato with yourself. Each toss expels trapped air and compacts the surface. You’re not squeezing — you’re throwing.
Why this matters: Air pockets inside the meatball will expand during braising and create cracks. A cracked meatball absorbs too much sauce and falls apart. A well-thrown meatball stays intact through two hours of gentle bubbling.
Each ball should be 7-8cm in diameter, roughly the size of a tennis ball. Place them on a plate and refrigerate for 15 minutes. The cold rest helps them hold their shape during searing.
Phase 2: Sear
Heat 1 tablespoon of vegetable oil in a clay pot or Dutch oven over medium-high heat. You want the oil shimmering but not smoking.
Gently lower each meatball into the oil using a large spoon or spatula. Do not crowd — if your pot only fits two at a time, sear in batches. Let them sit undisturbed for 2 minutes. Check the bottom — it should be golden brown with darker edges. Flip carefully, supporting the meatball with a spoon in each hand. Sear the other side for 2 minutes.
The tops and bottoms only — you’re not trying to brown the entire sphere. Transfer seared meatballs to a plate.
Why this matters: The sear builds a thin crust that prevents the meatball from absorbing too much liquid too fast. Without it, the exterior dissolves before the interior sets, and you get a shapeless blob instead of a sphere. The crust also adds a layer of roasted flavor that makes the finished dish taste deeper.
Phase 3: Build the Braising Liquid
Pour off any excess oil from the pot — a thin film is fine. Add the dark soy, light soy, rock sugar, 3 tbsp Shaoxing wine, and 400ml water or stock. Drop in the ginger slices, star anise, and cinnamon stick. Stir to dissolve the sugar. Bring to a gentle boil, then reduce to a simmer.
Taste the liquid. It should be savory, slightly sweet, with the warmth of the aromatics coming through. It should not be salty — the reduction will concentrate it. If it’s undersalted now, add a pinch. If it’s perfect now, it’ll be too salty later.
Phase 4: Braise
Return the meatballs to the pot in a single layer. The liquid should come halfway up their sides. If it doesn’t, add more water. Lay the napa cabbage leaves over the meatballs, covering them completely. Put the lid on.
Reduce the heat to the lowest possible simmer. You want one or two bubbles breaking the surface every few seconds, not a rolling boil. A boil will tear your meatballs apart. A simmer will let them set gently.
Set a timer for 1 hour 30 minutes. Do not lift the lid. Do not stir. Do not poke the meatballs to see if they’re done. The cabbage is steaming the tops while the liquid braises the bottoms. Lift the lid and you lose the steam, lose the temperature, add 15 minutes to your cook time.
Why this matters: The low-and-slow braise does three things simultaneously. It renders the remaining fat from the pork belly into the sauce. It breaks down the connective tissue in the shoulder — the collagen converts to gelatin, which is what gives the meatballs that shimmering, almost wet texture. And it infuses every millimeter of the meatball with the braising liquid, from the crust inward.
Phase 5: The Flip
After 1.5 hours, lift the lid. The cabbage should have collapsed into translucent, olive-green sheets. The braising liquid will have reduced by about a third and darkened to a deep mahogany. The smell will be pork fat and star anise and caramelized soy — if your neighbors haven’t knocked on your door yet, they’re being polite.
Gently flip each meatball using two spoons — one underneath for support, one on top to steady. Go slowly. A properly braised meatball is fragile at this stage. If one cracks, don’t panic. It’ll still taste right. It just won’t win any beauty contests.
Taste the braising liquid. The reduction may have concentrated the salt. If it needs adjusting, add a pinch of salt or a splash of water. Cover and braise for another 30-45 minutes. The meatballs are done when a chopstick slides through the center with zero resistance — like pushing through warm butter.
Phase 6: Serve
Use a slotted spoon to lift each meatball onto a mound of steamed white rice in a wide, shallow bowl. Spoon 2-3 tablespoons of braising liquid over the top — let it pool around the rice. Place a leaf of the braised napa cabbage alongside the meatball. It is not garnish. It is the sweetest thing on the plate.
Key Pitfalls
Using a food processor. You will get a paste. Pastes make dense meatballs. Dense meatballs are not lion’s head. I understand the temptation. Hand-chopping pork belly for 7 minutes is tedious. Do it anyway.
Overworking the meat mixture. Three to four minutes of one-direction stirring is enough. If you keep going for ten minutes, you’ll develop so much myosin that the meatballs turn springy — the texture of a fish ball, not a pork cloud. Stop when the mixture pulls away from the bowl.
Boiling instead of simmering. A hard boil will destroy your meatballs. They’ll crack open, the fat will render too fast, and you’ll end up with sad protein rafts floating in a grease slick. Keep the heat low. Those one or two bubbles per second are your friends.
Skipping the sear. Yes, it’s an extra step. Yes, it dirties a spatula. It’s also the difference between meatballs with a defined exterior and meatballs that merge with the sauce into an undifferentiated stew. Sear.
Using lean meat. Pork belly is 25-30% fat. That sounds alarming if you grew up in a culture that demonizes fat. But that fat is what makes the meatball tender. It renders during the braise, leaving behind channels of richness. If you substitute lean pork, you’ll get a dry, grainy meatball that absorbs sauce like a sponge — and never tastes integrated with it.
Skipping the cold rest before searing. Warm meat mixture is sticky and fragile. Fifteen minutes in the fridge firms the fat and makes the balls easier to handle. Skip it and you’ll struggle to get them into the pot intact.
Serving Suggestions
Serve one meatball per person alongside a generous mound of steamed jasmine rice. The rice is not an afterthought — it’s the vehicle for the sauce. Every bite should combine rice, meatball, and braising liquid.
For a banquet-style presentation, serve all four meatballs in the clay pot at the table. Let people spoon their own onto rice. This is how it’s done at Chinese wedding banquets, and the drama of lifting the lid on a clay pot full of steaming lion’s heads is worth the extra dish to wash.
A simple side of stir-fried greens — bok choy, gai lan, or pea shoots with garlic — balances the richness of the braise. Nothing else is needed.
Leftovers, if you’re lucky enough to have them, improve overnight in the fridge. The meatballs absorb more sauce as they sit. Reheat gently in the braising liquid with a splash of water — never microwave, which will turn the fat rubbery and the lean tough.
For the full story behind this dish — the wedding banquet, the grandmother’s spoon, and what happens when you order lion’s head at a bad restaurant — read Lion’s Head Meatballs: The Giant Pork Meatball That Collapses Under a Spoon .
💬 Comments